
Homemade Almond Milk
/Even after I purchased my fancy schmancy, high-speed Vitamix blender (which I LOOOOVE!), I used to have zero interest in making almond milk. I thought it was too expensive and took too long. Quite frankly, I didn't want to be bothered with what I use to consider to be such an arduous process. Well, things change and for the last 3 weeks, I have been totally obsessed with making my own almond milk!
After I made one batch on a whim, I fell in love with the taste of it and when that batch was finished, I kept making more...and more...and more. Recently I tried some store-bought almond milk and noticed that I was no longer crazy about the taste. Homemade almond milk tastes SO much better and in just a few weeks my taste buds must've grown accustomed to the pure taste of the freshly-made variety.
I realize now that those thoughts I had before about how the process was such a hassle was complete nonsense. I timed it and it took a whopping 5 minutes to make. FIVE MINUTES!
Then I looked at how much money I spent.
Turns out, the cost of the homemade almond milk was about the same (if not slightly less expensive), but because you get both almond milk AND almond pulp out of the recipe, you end up saving more money (whereas if you needed almond meal, you'd have to buy almond milk and almond meal separately). Some quick tips to save $$ are buying almonds in bulk and buying them when they're on sale (you can buy a lot at once and freeze them to make them last longer).

Homemade Almond Milk
Yields: Approximately 2.5 to 3 cups almond milk
INGREDIENTS
1 cup raw almonds
Water for soaking
2-3 cups water
OPTIONAL INGREDIENTS
To make Vanilla Almond Milk: Add 1/4-1/2 tsp vanilla extract (or you can use a chopped vanilla bean)
To make Sweetened Almond Milk: Add liquid stevia or 1-2 pitted medjool dates
To make it Cinnamon-y: Sprinkle in some ground cinnamon
Feel free to try all of the above!
DIRECTIONS
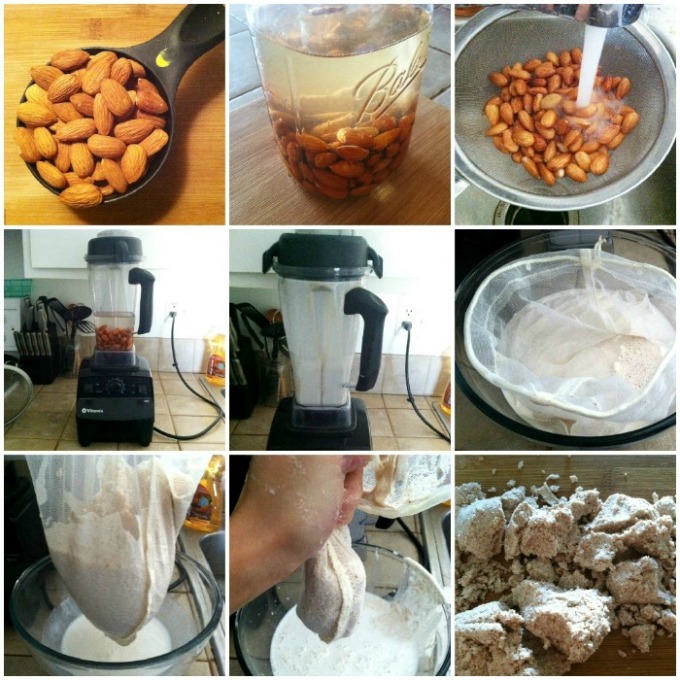
Soak almonds overnight or longer (I soak them anywhere from 8-24 hours). To do so, place them in a container, pour enough water to cover the almonds, then cover the container. No need to refrigerate- just leave them hanging out on the counter at room temperature.
Drain and rinse the almonds using a finely meshed strainer.
Place the soaked almonds in a blender (high-speed ones work best) - Note: I have never tried this in a regular blender...I imagine it would still work but the pulp pieces will probably be bigger...2 cups of water might work better with this kind of blender.
Add 2-3 cups water (The less you add, the creamier it'll be. The more you add, the greater the yield.)
Blend at high speed until smooth (about 30-60 seconds)
Place a nut milk bag (insert awkward giggle here...) or cheesecloth over a large bowl or pitcher
Pour mixture into the nut milk bag or cheesecloth
Squeeze out the liquid into the bowl/pitcher. You'll be left with almond pulp in the nut milk bag or cheesecloth and fresh almond milk in the bowl/pitcher.
Store the almond pulp in the refrigerator (in a covered container) and use it in other recipes that call for almond meal (but only recipes where the almond meal is going to be combined with wet ingredients...this pulp won't do a whole lot if you're using almond meal as a dry ingredient, like as a bread crumb substitute for instance).
Almond milk will last for approximately 4 days in an airtight container in the fridge. Make sure you shake it first before consuming it as the milk will separate.
IF ADDING ANY OF THE OPTIONAL INGREDIENTS, LISTEN CLOSELY:
If adding in a fresh vanilla bean and/or dates, add to the blender along with the almonds in Step #3
If adding in vanilla extract, liquid stevia, and/or cinnamon, do NOT add to the blender in Step #3. Instead, once you've made your almond milk (Step #8), rinse out your blender (to get rid of the pulp remains) and pour the almond milk back into the blender. Then add the vanilla extract, liquid stevia, and/or cinnamon and blend on low to combine.
A NOTE ABOUT NUT MILK BAGS
While you can use cheesecloth or a finely meshed strainer, I think nut milk bags (goofy name aside) - also known as Sprouting Bags - are totally the way to go. They're relatively inexpensive and work extremely well. If you don't have one and would like to get one (or several!) I encourage you to check out the "More-Than-A-Nut-Milk-Bag" which is the pride and joy of my raw food chef friend, Brenda, of Rawsome Creations. You can read the the full story about these fair trade nut milk bags that support women in Bali here.
If you want to make freshly squeezed juice but you don't have a juicer, you can blend up your veggies into a smoothie, pour it into your nut milk bag and squeeze out all the juice so you're left with juice!

You know what tastes INCREDIBLE with homemade almond milk? Chia Pudding.
Best healthy dessert EVER for pretty much any eating style or dietary needs (vegan, gluten-free, low in sugar, paleo-friendly, great source of fiber and healthy omega-3 fats). I can't get enough of this stuff. It's actually one of the only reasons why I make almond milk!

And you know what I do with the leftover almond pulp?
I made these Gluten-Free Blueberry Protein Pancakes for One, which are perfect if you're in the mood for something bread-y but you don't want to bloat like crazy.
